Writing events to Google Calendar with Zapier
- girizano

- Jun 24, 2019
- 4 min read
The goal
We would like to show a Wix form which lets a user fill out basic event data (store it into our own collection, optional, not treated) and write those data to a Google Calendar.
We will use Zapier to do the last part, Wix for the form and the communication.
What is Zapier?
Zapier writes wrappers around existing API´s. Example: Google Calendar offers its own API, but, ... it´s not for the faint hearted. Zapier builds a wrapper (they call it a Zap) around such a Calendar API, which offers not all, but most commonly used functions (Create New Event, Update, etc). And, they offer a nice point-and-click visual interface to let us make use of those functions.
In short: Zaps are basically NPM´s with a Zapier User Interface attached.
Zaps have as a minimum 2 parts:
1) a trigger (like: if I recieve a new email in my Gmail Inbox)
2) an action (like : then put the fields Sender/Description/Bodytext into a Google Spreadsheet row)
Basically, it is an IF-THIS-THEN-THAT paradigm (and a similar product on the mobile market is called exactly that: IFTTT)
Free Zapier accounts are limited to this. Paid plans offer more steps. For our purpose, the free account will do.
The idea
1) build a Wix Form which lets user fill out event description, start date/time and end date/time
2) when user pushes "Create Event", we send these data to Zapier (the trigger)
3) Zapier picks up the data we sent and writes the event data to our Google Calendar (the Action)
So what´s the Trigger here?
The trigger here is a Zapier Webhook (if this is something unfamiliar, Zapier has videos explaining the concept). You define a webhook (in this case "Listen to a http-post") which functions as the trigger. Then, in the "Action"-part, we define how to map the data we sent to fields in the Google Calendar, so every time we sent new data, Zapier knows what to do.
1) The Wix form
It will look like this:

It consists of 2 input boxes and a standard Datepicker + TimePicker for both Start Date and End Date. Make sure you call them like this, so the code below will run unaltered.
$w('#frmTitle')
$w('#frmDescr') $w('#frmDateStart') $w('#frmTimeStart') $w('#frmDateEnd') $w('#frmTimeEnd')
The button should be called : btnCreateEvent.
On the Page Code Tab, copy and paste this:
import {
sendEventData
}
from 'backend/zapier';
$w.onReady(function () {
});
export function btnCreateEvent_click(event) { let strTitle = $w('#frmTitle').value; let strDescr = $w('#frmDescr').value; let datDateStart = $w('#frmDateStart').value; let datDateEnd = $w('#frmDateEnd').value; let strtimeStart = $w('#frmTimeStart').value; let strtimeEnd = $w('#frmTimeEnd').value let separatorPos = strtimeStart.indexOf(":"); let numHourStart = parseInt(strtimeStart.slice(0, separatorPos), 10); let numMinuteStart = parseInt(strtimeStart.substring(separatorPos+1), 10); separatorPos = strtimeEnd.indexOf(":"); let numHourEnd = parseInt(strtimeEnd.slice(0, separatorPos), 10); let numMinuteEnd = parseInt(strtimeEnd.substring(separatorPos+1), 10); datDateStart.setHours(numHourStart); datDateStart.setMinutes(numMinuteStart); datDateEnd.setHours(numHourEnd); datDateEnd.setMinutes(numMinuteEnd) console.log(strTitle); console.log(strDescr); console.log(datDateStart); console.log(datDateEnd); console.log(strtimeStart +" " + typeof strtimeStart); console.log(strtimeEnd +" " + typeof strtimeEnd); console.log(numHourStart); console.log(numMinuteStart); console.log(numHourEnd); console.log(numMinuteEnd); console.log("New date1=" + datDateStart); console.log("New date2=" + datDateEnd); console.log("Done"); sendEventData (strTitle, datDateStart, datDateEnd, strDescr ); } Note: the import-statement will show a red dot. That´s because we have not defined it yet. Don´t worry. It will disappear once we do (below).
Also, you will notice a bit of time manipulation in the code above. The reason is this: we use a DataPicker and a TimePicker (unbound to a dataset). The DatePicker returns a date object with the time part set to 00:00 (as you should know, dates in Javascript consist of both date AND time). The TimePicker (make sure you set it to display full hours with a semicolon, like 16:30) returns just a string.
So the code basically patches the time string into the date object, like Google Calendar expects.
The console.log´s are just for debugging, you should take them out at some point!
2) The backed code
Create a new backend file called "zapier.jsw" and paste the following code:
import {fetch} from 'wix-fetch'; export function sendEventData (title, startDate, endDate, description ) { // Zapier hook for Google Calendar const url = "https://hooks.zapier.com/hooks/catch/????????????/"; //data for Google Calendar let updateData = { "title": title, "startDate": startDate, "endDate" : endDate, "description" : description }; const headers = { "Content-type": "application/json" }; const request = { method: 'POST', headers: headers, body: JSON.stringify(updateData) }; console.log("SendEvent"); return fetch(url, request) .then((httpResponse) => { if (httpResponse.ok) { console.log('Event is sent!'); } else { return httpResponse.text() .then(text => Promise.reject(text)); } }) .catch((error) => { console.log('Oops... ' + error); }); }
Note: please notice the lines
// Zapier hook for Google Calendar
const url = "https://hooks.zapier.com/hooks/catch/????????????/";
This whole URL should be replaced by the URL which Zapier gives you (see below). That´s called an Endpoint. It is private (so never put it in frontend code) and works only for this Zap!!!
3) Create the Zap
a) OK, so we assume you have created your free Zapier account. Now in Zapier, click the "Make a Zap" button at the top. In the "Choose a Trigger App", type "webh" and immediately, the option "Webhooks by Zapier" will appear. Select it.

Once you did, Zapier will ask you which type of hook. Choose "Catch Hook" and click "Save and Continue".
b) Now you will see a screen like this:
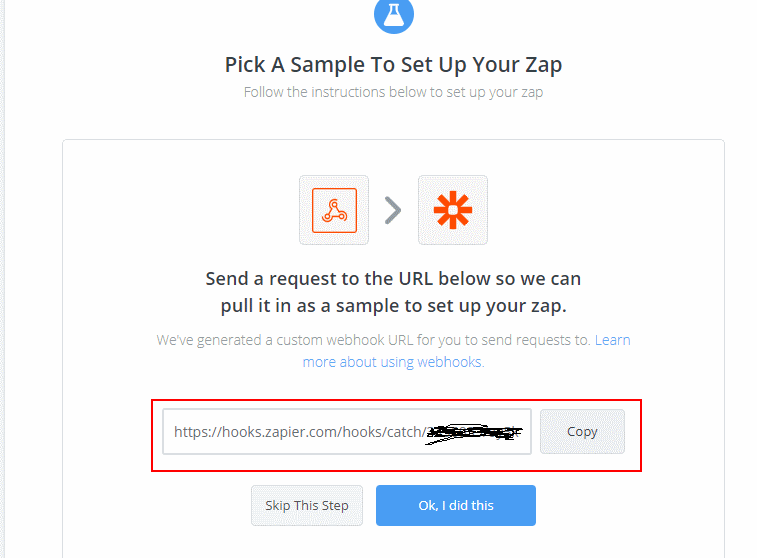
Important: copy the WHOLE URL and paste it back into the zapier.jsw backend file and then Save everything in Wix and Publish it.
This URL is the Endpoint we were talking about and it is user/zap-unique. Zapier asks for sample data, so it can help us choosing what to do with it.
Now, go to your Published page and fill out an event. Press the "Create Event" button on the form.
After a couple of seconds, Zapier will have found it.
c) Now, you will have to specify the "Action"-part. That is easy: select Google Calendar. You will have to logon with your Google Account and grant Zapier access to it. But, at least you will not have to do OAuth yourself!
Zapier now asks you to map your data to specific fields in a Google Calendar (tip: use the +-sign behind alll the fields, it will let you pick your data). Save it, give it a name, activate it and voila, you are done.
Note: you can also do colours. Haven´t tried it, but remember Google Calendar has a closed lists of allowed colours (hex codes). It´s somewhere in the Google Calendar docs.
Have fun!


Comments